Wu Qin Xi for Beginners: The Five Animal Frolics, Form by Form
Key Takeaways
- Wu Qin Xi is one of the four official health qigong routines promoted by the Health Qigong Management Center of the General Administration of Sport. The order of the five animals follows the sequence recorded in the Records of the Three Kingdoms.
- The set has twelve movements, not eight: ten animal movements (two per animal), plus an opening breathing transition and a closing gathering.
- Each animal has its own movement quality - the tiger reaches, the deer twists, the bear rolls, the ape scatters, the bird soars - and the waist is the axis that drives all of them.
- Four breathing rules run through the whole set: inhale on the rise, exhale on the fall; inhale on the opening, exhale on the closing; inhale before you exhale; store the breath before you release it. Never hold the breath.
- The fifth form is the bird form (bird stretch, bird fly), not the crane form. The crane is the model the bird borrows its posture from, not the name of the form.
- Every form carries a documented common mistake and the correction taught with it - the part most modern instruction leaves out.
Written by Master Mingde Chen, 12th Generation Chen Style Tai Chi Inheritor Reviewed by Dr. Jing Li, PhD in Biomechanics, Chief Technical Consultant at Wuji Taichi
Wu Qin Xi (五禽戏) is one of the four official health qigong routines promoted by the Health Qigong Management Center of the General Administration of Sport. It is the most playful of them: instead of counting to eight, you become a tiger, a deer, a bear, an ape and a bird whose posture borrows from the crane, in that order. The order is not arbitrary — it follows the sequence recorded for Hua Tuo in the Records of the Three Kingdoms: tiger, deer, bear, ape, bird.
Each animal contributes two movements, so the core set is ten, and the taught version adds an opening breathing section and a closing section for a total of twelve. The whole set can be practised as a whole, animal by animal, or one animal at a time — which is exactly how beginners should approach it.
This guide walks the twelve movements in order, with the breathing and the single correction that matters most for each. If you want the full correction list for every movement, see Wu Qin Xi Common Mistakes.
Two Older Books You Should Know About
The version you learn today is not the oldest surviving description of the five animals. Two late-imperial woodblock manuals preserve an earlier, much shorter set, and they are why historians can talk about Wu Qin Xi at all before the modern era.
- The Wu Qin Shu (五禽书), printed in the Wanli era (1573–1620) as part of the Yimen Guangdu (夷门广牍) collection edited by Zhou Lujing (周履靖), which also carried the Chifeng Sui (赤凤髓).
- The Wu Qin Tu (五禽图), printed in the Daoguang twelfth year (1832) in the Wanshou Xianshu (万寿仙书), with five diagrams and explanatory text.
Two details in them are worth knowing.
A different animal order. Both manuals sequence the set as tiger, bear, deer, ape, bird — not the tiger, deer, bear, ape, bird order recorded for Hua Tuo in the Records of the Three Kingdoms. The modern health qigong set deliberately returned to the classical order; the Ming–Qing sets had drifted away from it.
Five forms, not twelve. Each book holds five postures, all of them standing and stepping, and the texts add breath and imagery to the animal imitation: lift as though holding a thousand catties of iron, swallow and hold the breath, hold the mind still. That is a far lighter, more portable practice than the twelve-movement set taught today.
The Wu Qin Tu also appears to be the later of the two: its figures travel through a larger range, and its bird and ape face the opposite direction. Scholars read it as a version built for practice while walking rather than working in place. One lively record of how widely the set travelled is a passage in Pu Songling’s Strange Tales from a Chinese Studio (聊斋志异), in the story Feng Sanniang (封三娘), where a practitioner remarks that of all the health manuals going around, only the Hua Tuo five-animal charts are not badly mistaken.
Two honest caveats. Those books also carry the usual health claims of their day; that is period language, not evidence, and we do not repeat it here as fact. And “Hua Tuo” in all of this is a name the tradition carries — as the glossary entry sets out, the surviving prints are more than thirteen centuries removed from anything Hua Tuo could have written down.
What the Set Is Actually Training
The point of imitating animals is not decoration. Each section trains a different movement quality, and the set is organised around the waist rather than the arms or the legs:
| Section | Movement quality |
|---|---|
| Tiger | Forceful, expansive reach |
| Deer | Twisting, lengthening stretch |
| Bear | Heavy, grounded rolling |
| Ape | Quick, playful lightness |
| Bird | Balance and slow soaring |
Two structural ideas hold the set together. First, the waist is the pivot — most movements begin in the lower back and travel outward, which is why the practice is felt in the spine and hips rather than the arms. Second, every section is a pair of movements that differ in quality, so the set trains both a movement and its opposite (the tiger thrusts outward, the bear rolls inward).
The set also deliberately trains the small joints. Several movements end in fingers extended or toes lifted, because the extremities are where attention is easiest to lose.
The Twelve Movements, Form by Form
1. Opening (起势)
Stand with feet about shoulder-width apart, knees soft, weight even. Settle the breath before anything moves: inhale as you lift, exhale as you lower, and let the shoulders drop rather than rise. The opening exists to get you into a quiet, upright, symmetrical stance — everything after it is built on this.
Breathing: natural or abdominal. Two or three slow breaths before you start.
2. Raising the Tiger (虎举)
Press both palms down with the fingers spread, curl the first two finger joints into a claw shape, then rotate into a full fist starting with the little finger. Lift both arms overhead, opening the fingers again as they rise, with the elbows completely straight — as if you were holding something heavy. Rotate back into fists, palms facing each other at shoulder width, draw the elbows forward and down, and press to the sides of the body.
The detail beginners miss is the finger sequence. Going straight from open palm to fist skips the claw and loses most of the hand work.
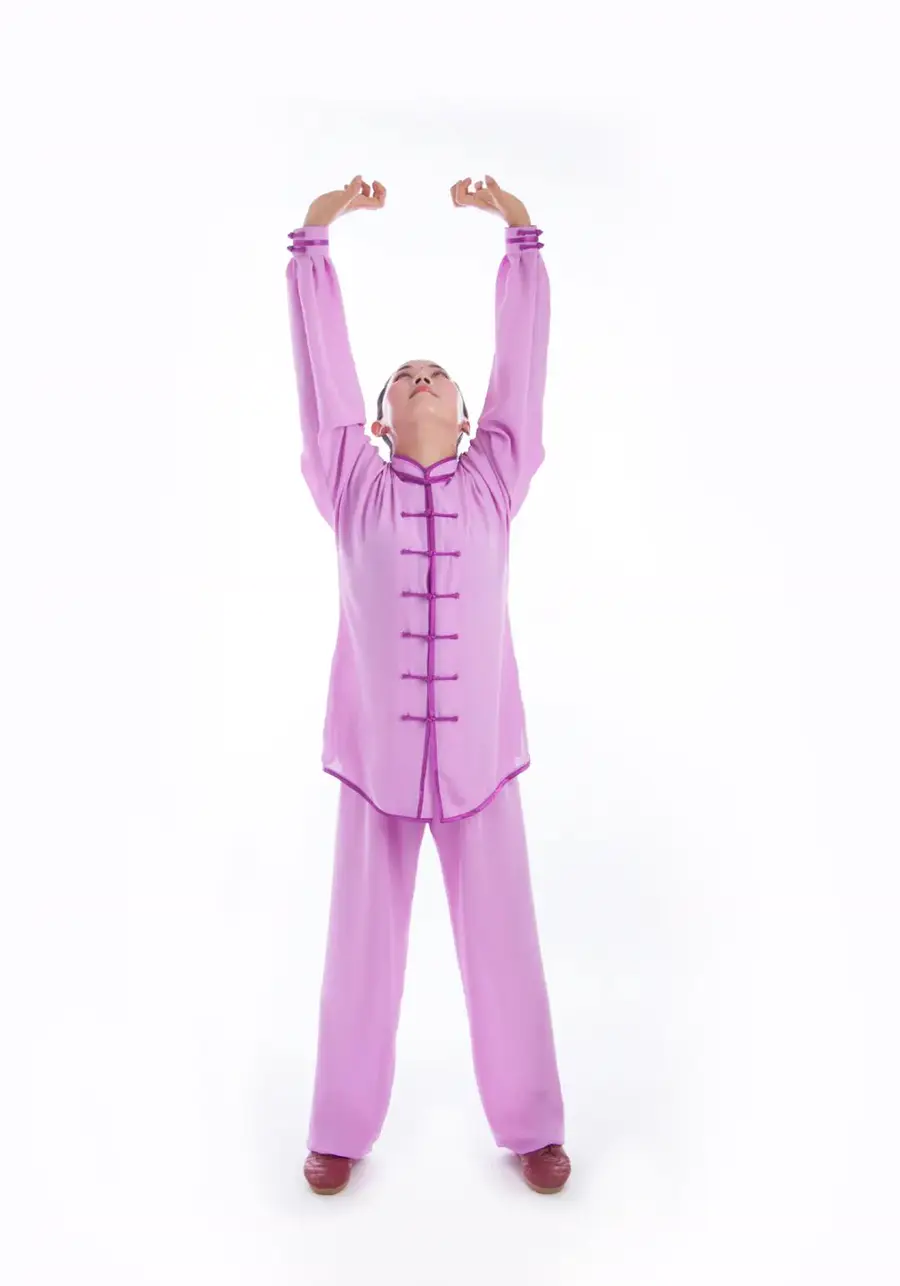
Breathing: inhale as you lift, exhale as you lower. If your breathing is short or fast, use the two-breath version: inhale as the fists reach shoulder height, exhale as the hands rise overhead; inhale as they come down to the shoulders, exhale as the hands press to the waist.
Correction: elbows must be fully straight at the top. Bending them turns a shoulder movement into a shrug.
3. Pouncing the Tiger (虎扑)
With empty fists, draw two vertical circles in front of the body. The first time, lift the fists to the chest, extend them forward and upward until they are parallel to the floor — a long draw through the waist, with the chest lifted and the hips pressing back — pause, then press the palms down beside the knees. The second circle flows straight down into the pounce: weight sinks, the front knee bends, and both hands reach forward into claw shapes beside the front knee.
Look at your hands, not at the floor. Keep the back straight and let the hips move back rather than curling the spine.
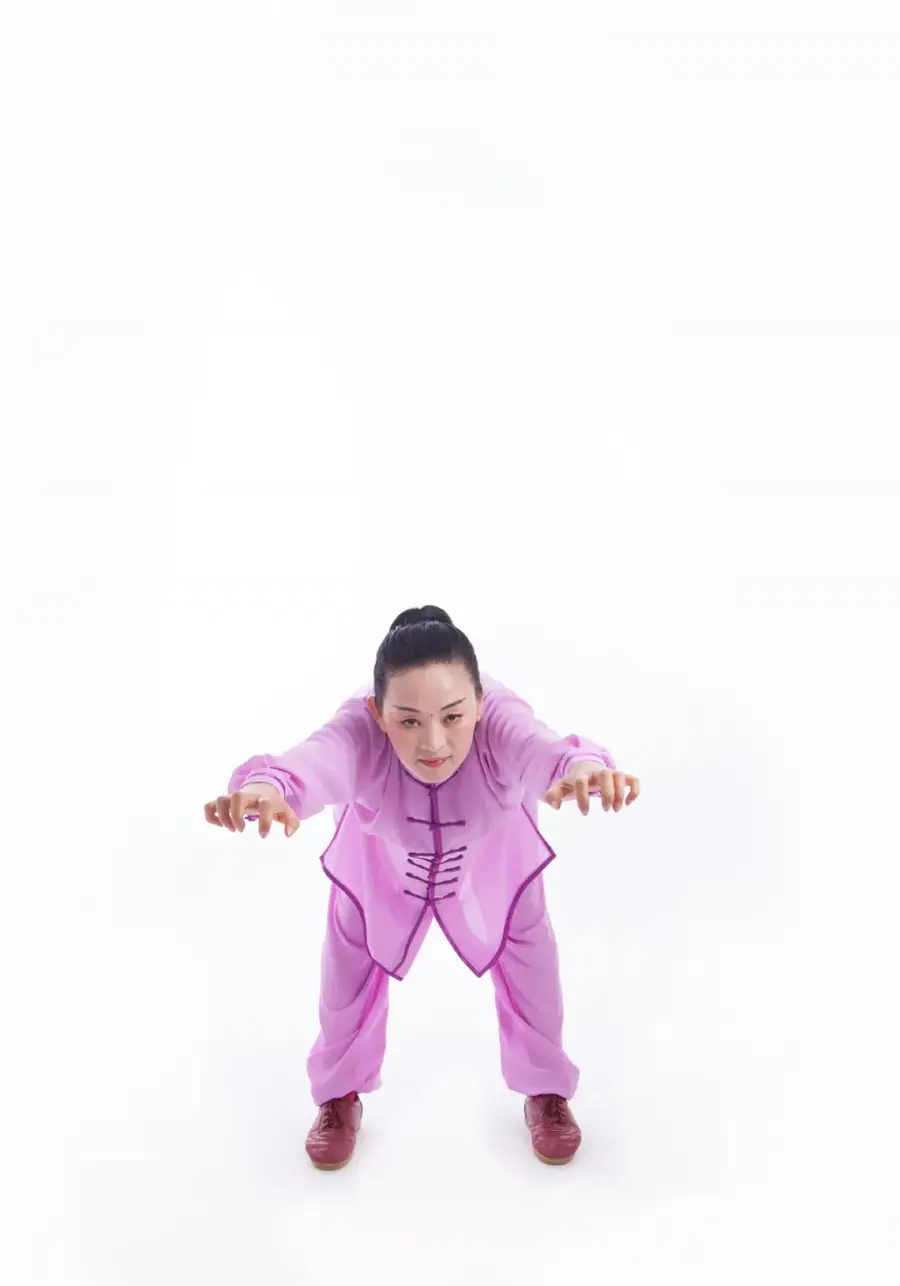
Breathing: two breaths, one per circle. The downward pounce pairs with a quick, deep exhale from the lower abdomen.
Correction: the step out is no longer than your own foot, the weight stays over the back leg, the torso leans forward about 45 degrees, and the elbows stay slightly bent. Stepping too far forward is the single most common cause of losing balance here.
4. Side-Raise Breathing Transition (侧举调息)
Both hands lift forward and upward to about shoulder height, palms up, elbows soft, then lower. This short transition appears four times in the set — once between each pair of animals — and it is not filler. It is where the breathing reorganises and the mental focus changes from one animal to the next.
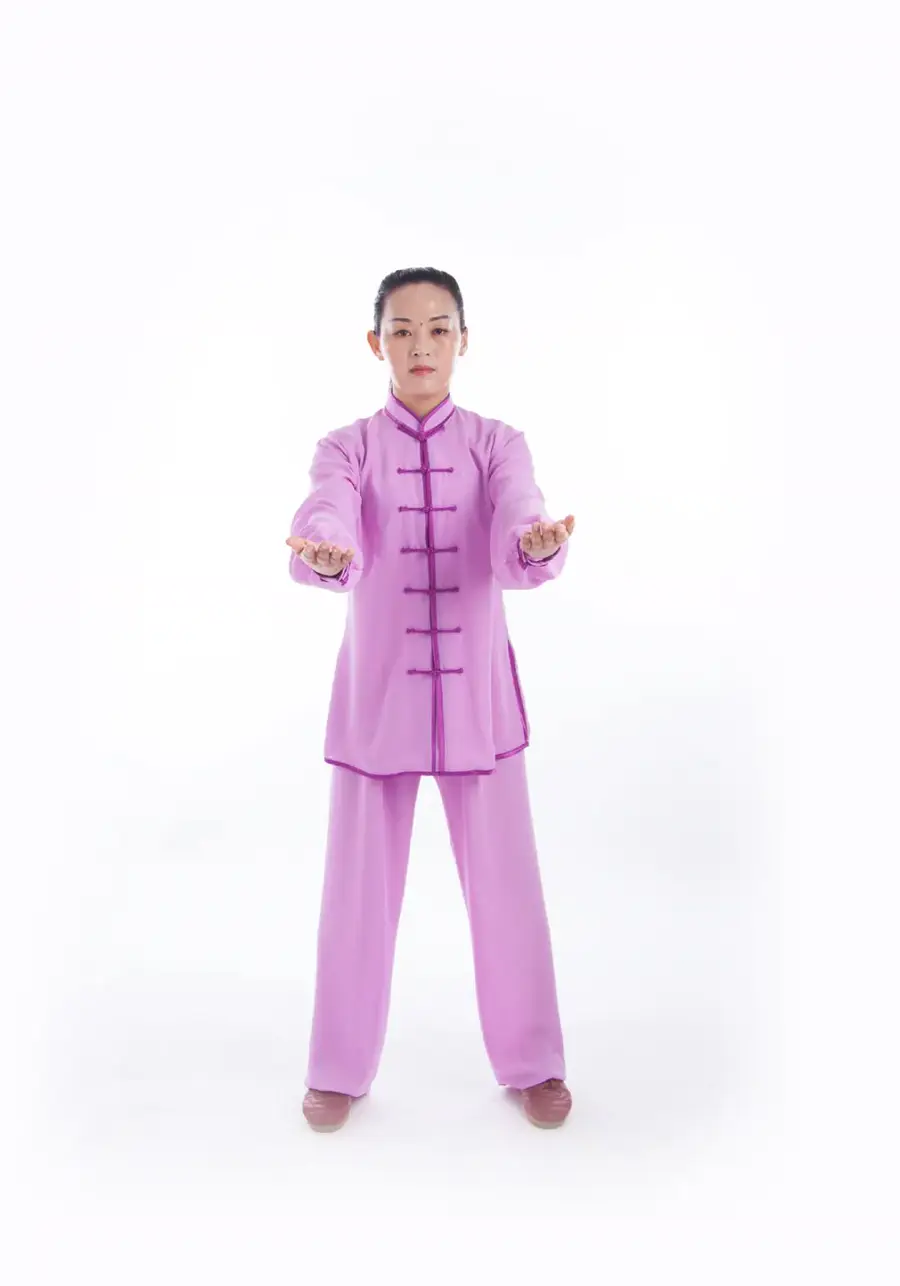
Breathing: inhale as the hands rise, exhale as they fall. Keep it smooth.
5. Deer Stamping (鹿抵)
Four beats. Bending the knees slightly, shift the weight right and step the left foot forward and slightly across, heel first, with both empty fists swinging to the right at shoulder height. Then forward onto the left leg, bending the left knee and turning the toes outward while the right leg straightens behind; the hands form the deer antler — middle and ring fingers curled and locked tight, thumb opened outward, index and little finger straight — and sweep a flat circle to the left as the waist turns. Then side-bend and twist: the left elbow presses against the left waist while the right arm rotates up and back, looking at the right heel. Finally turn back, draw the foot in, and circle both empty fists down in front.
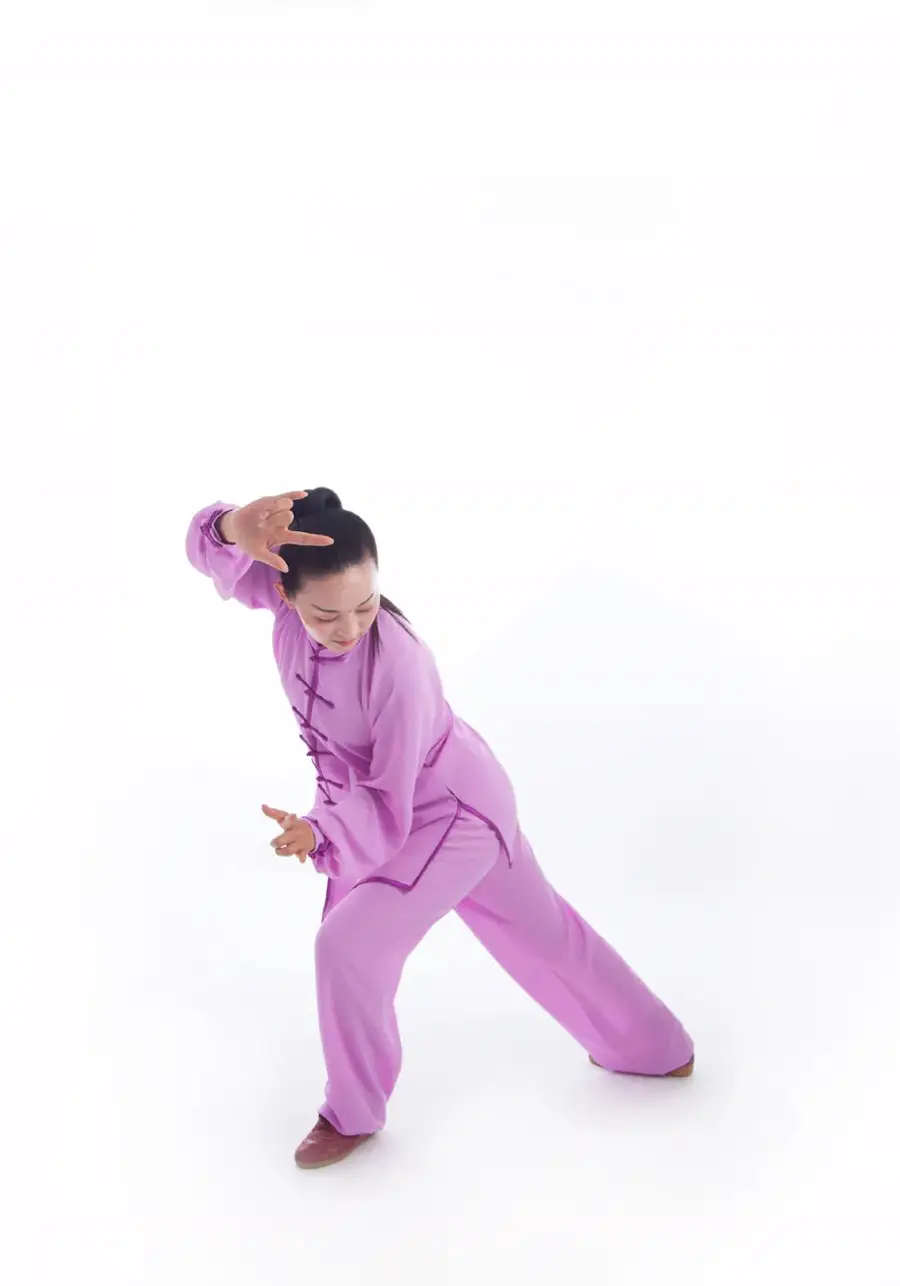
Breathing: two breaths. Side swing to shoulder height is the inhale; the twist and side bend is the exhale. When the antler reaches its full extension, the force comes from the lower abdomen.
Correction: the front toes turn outward by at least 90 degrees so the back foot cannot step onto the same line, and the back foot stays flat. Lifting or inward-rolling the back heel to see the heel throws the twist out.
6. Deer Galloping (鹿奔)
Four stages. Step up into a bow stance, empty fists swinging forward and up to shoulder height, palms down — a large step, a small landing, like turning a wheel. Sit the weight back: the front leg straightens, the torso folds, the abdomen draws in, and the fists rotate into antlers, forming the horizontal bow across the shoulders and the vertical bow through the back, waist and hips. Draw the body back up, release the antlers into fists, and change feet with a light hopping step that lands toe-first and then rolls onto the whole foot.
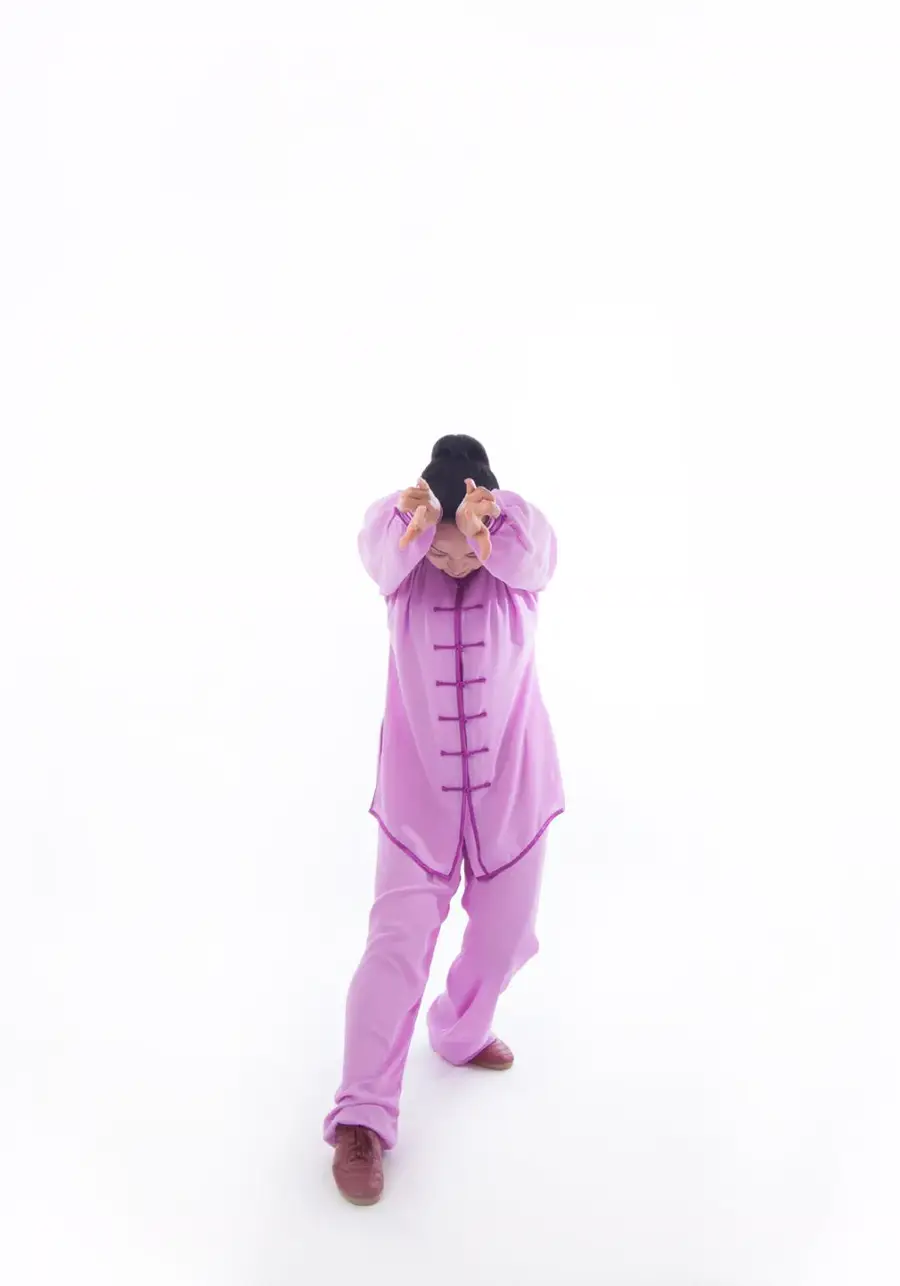
Breathing: two or three breaths depending on how settled you are. Sit back and draw in — inhale. Move forward and release — exhale.
Correction: the vertical bow needs three things together: shoulders down and pressed inward, a deep abdominal draw, and the hips pulled forward under counter tension. Landing the foot about a shoulder-width apart, with the back heel inward-closing slightly, keeps it stable. The step up should be shorter than your own foot.
7. Bear Rolling (熊运)
Both arms hang down and the hips stay fixed. The hands form bear paws — thumbs pressing onto the index fingertips, the remaining fingers together and bent, the web of the hand opened — and rest lightly on the lower belly, facing each other. Then the hands are moved passively: as the waist and abdomen circle around the navel, first clockwise and then counter-clockwise, the hands travel with them.
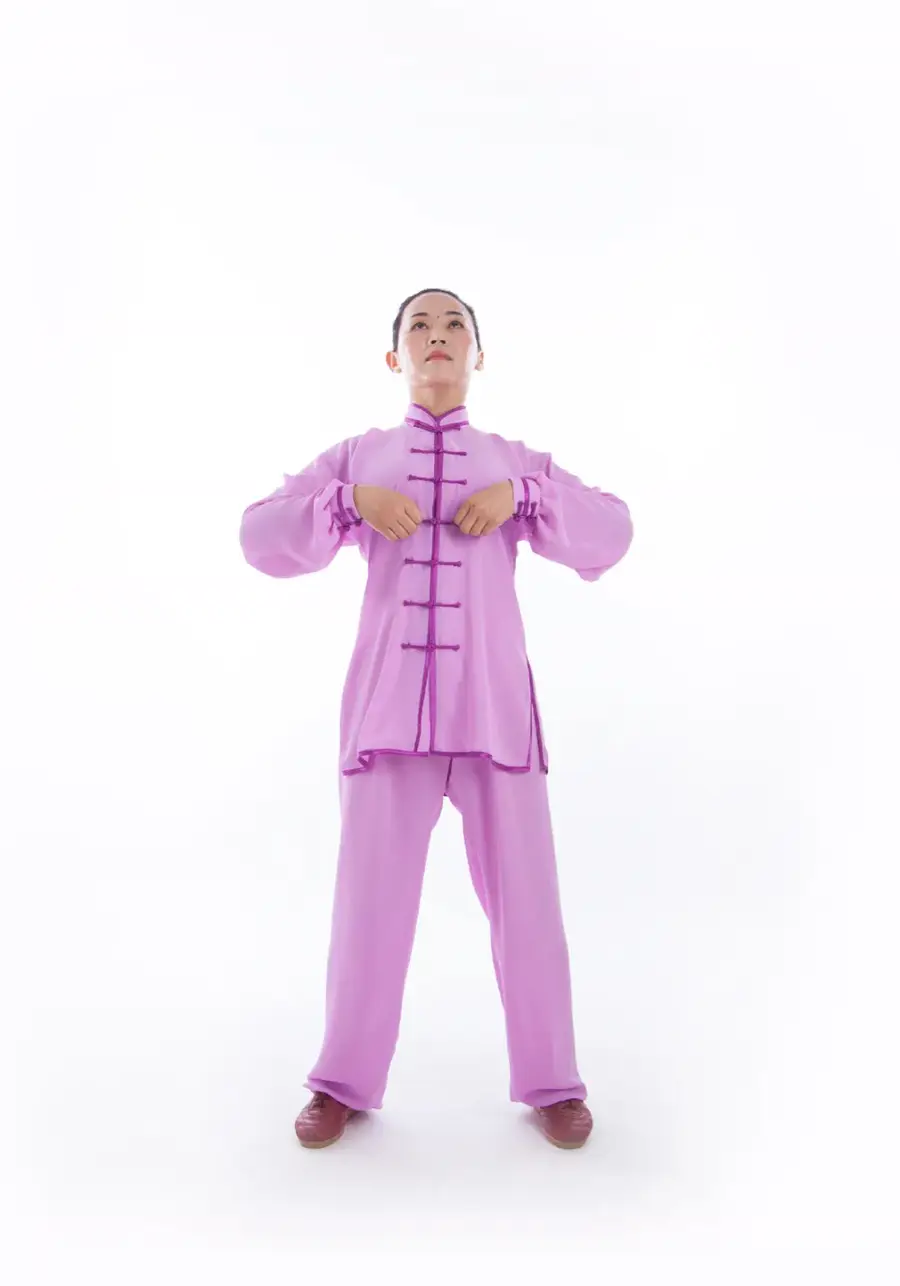
Breathing: one breath per cycle. The lift and expansion on the way up is the inhale; the press and squeeze coming down is the exhale.
Correction: the hands must not circle on their own. If the torso stays still and the hands rub the belly, the movement has lost its purpose. Relaxed shoulders are what make the transfer work, and the circle is small — roughly ten centimetres across, with the elbow angle closing above the navel and opening below it.
8. Bear Swaying (熊晃)
The sequence is: lift the left hip, release the waist and hips, bend the leg, shift the weight, land, settle and shake the hips through. Then press the left waist — release — rotate right, lean left into the right leg, swing the arms forward. Then sit the weight back, press the right waist — release — rotate left, lean right, swing the arms forward.
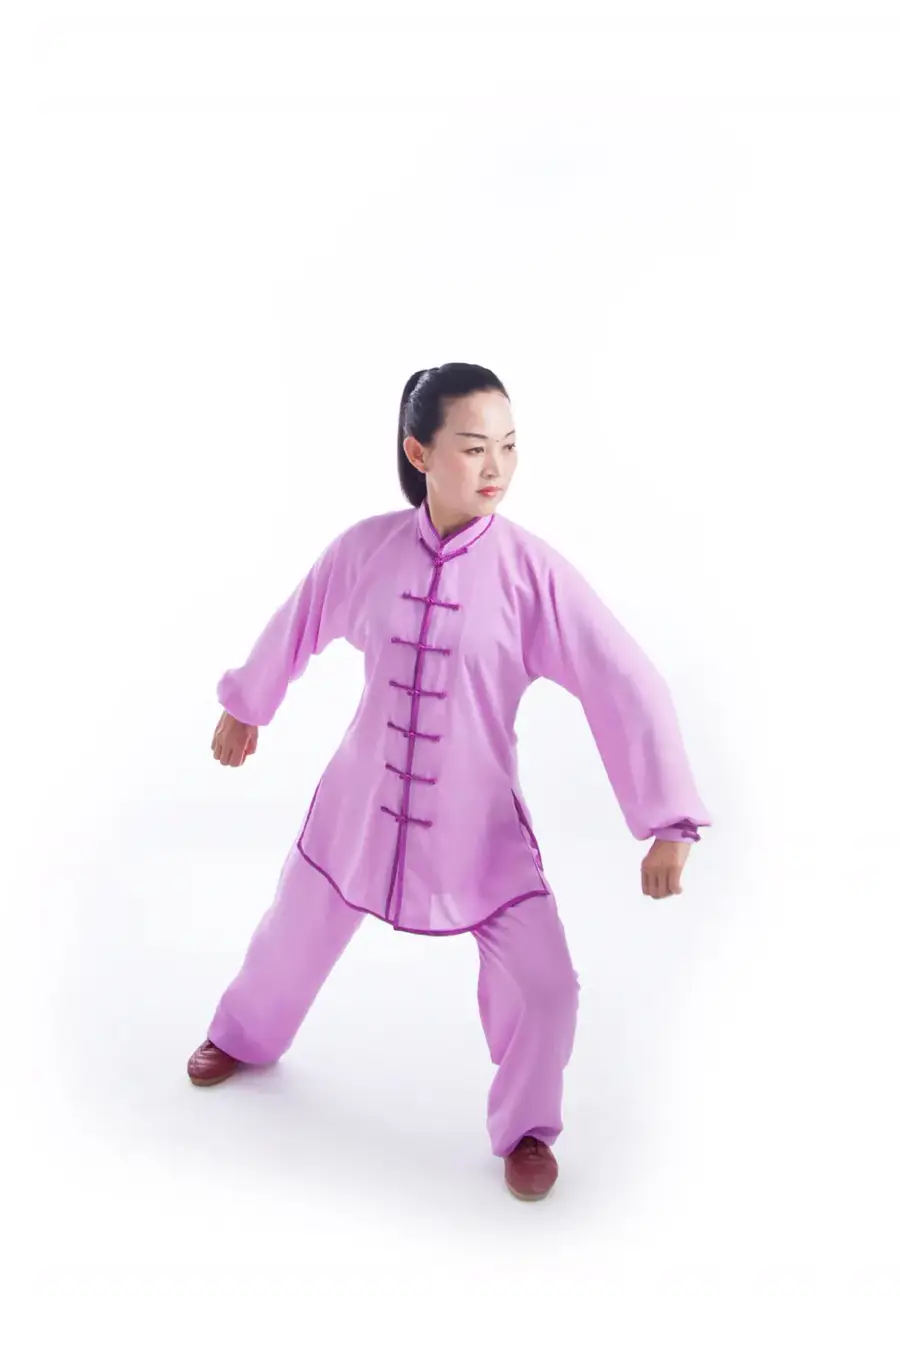
Breathing: two breaths. Lift the hip and open the chest — inhale. Land and release — exhale. Sit back and gather — inhale. Press forward and open — exhale.
Correction: three things matter. The foot must leave the floor because the hip lifted it, not because you stepped. The foot should land flat at once with a visible jolt through the hip joint — a drop-and-settle, not a stamp. And the step lands wider than the shoulders with the toes low, not on tiptoe.
9. Ape Raising (猿提)
The hands start open in front of the lower belly, then the wrists fold quickly into an ape hook, fingertips pinched, hooks pointing down. The hands rise to the chest with the shoulders shrugged and drawn in, elbows hanging, hooks facing each other five to ten centimetres apart. The head turns to survey one side about 90 degrees and returns. As the shoulders drop and the hooks open into palms, the hands press down and the abdomen draws in, the heels lift.
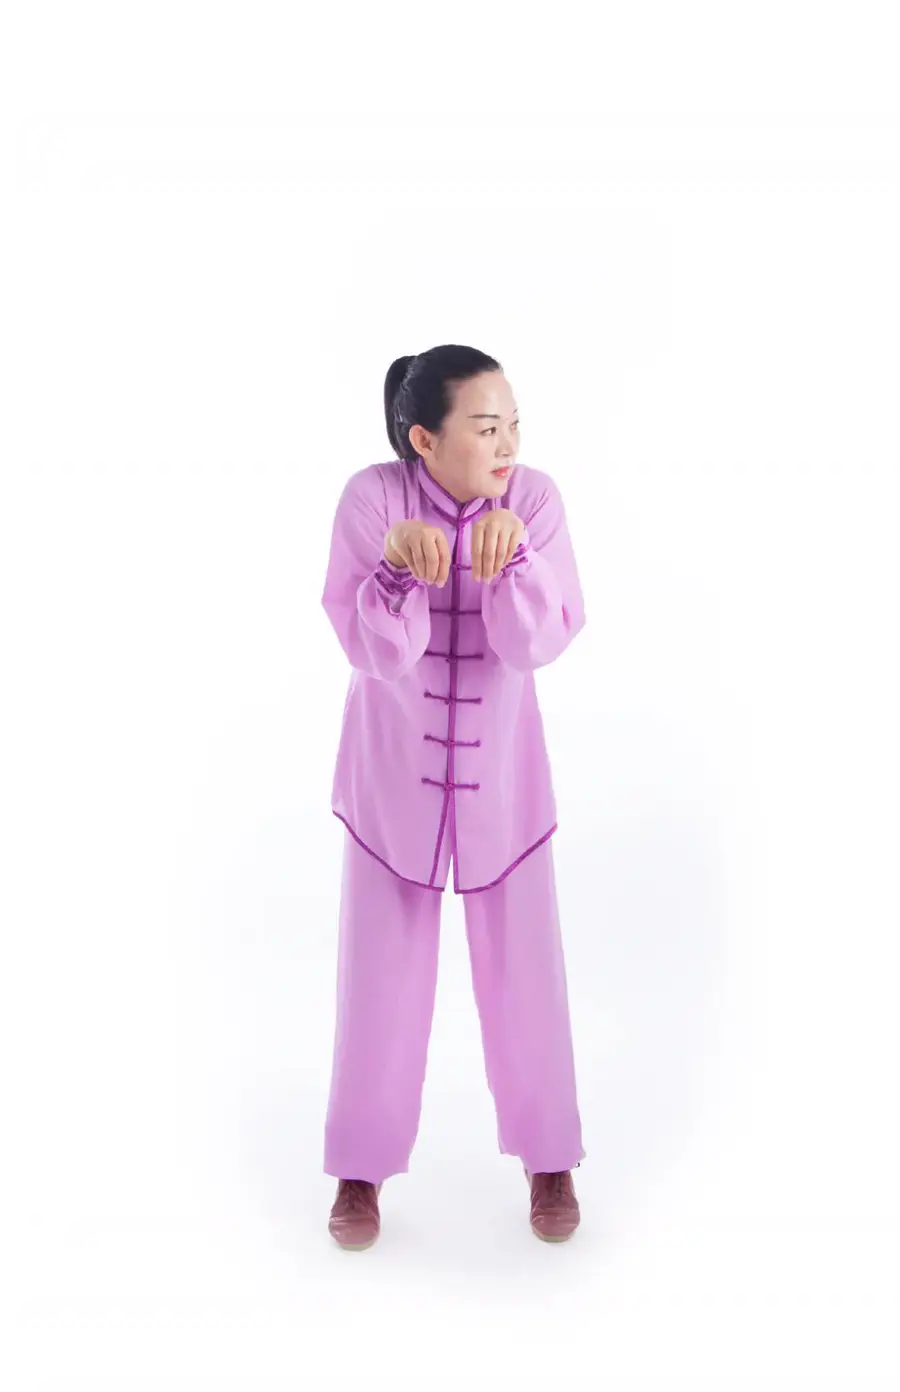
Breathing: one breath, inhale on the lift, exhale on the release. This is the one movement where the breath is naturally inverted — rising and tightening draws the lower abdomen in, releasing and dropping softens it.
Correction: the rise has an order — lift the heels and shrug the shoulders first, then fold the wrists; the sequence to shift the weight upward is shrug, draw the abdomen, lift the heels, turn the head. The curl centres on the upper chest, with the upper arms tucked against the ribs so the elbows do not wing out.
10. Ape Reaching (猿摘)
With the left hook at the waist, the right palm swings forward, then arcs down, across the belly and up beside the head to temple height, palm inward. It presses straight down as if seizing a branch, then arcs out to the right into a hook. At same time the left arm sweeps back, up and forward into a hook above and in front of the head. The left hand then closes and draws in beside the left shoulder, palm up, as if holding a peach; the right hand turns from hook to palm and supports below the left elbow. The lower body withdraws into a slanted step, settles back, then reaches out and up into a long stretch before returning to a narrow stance.
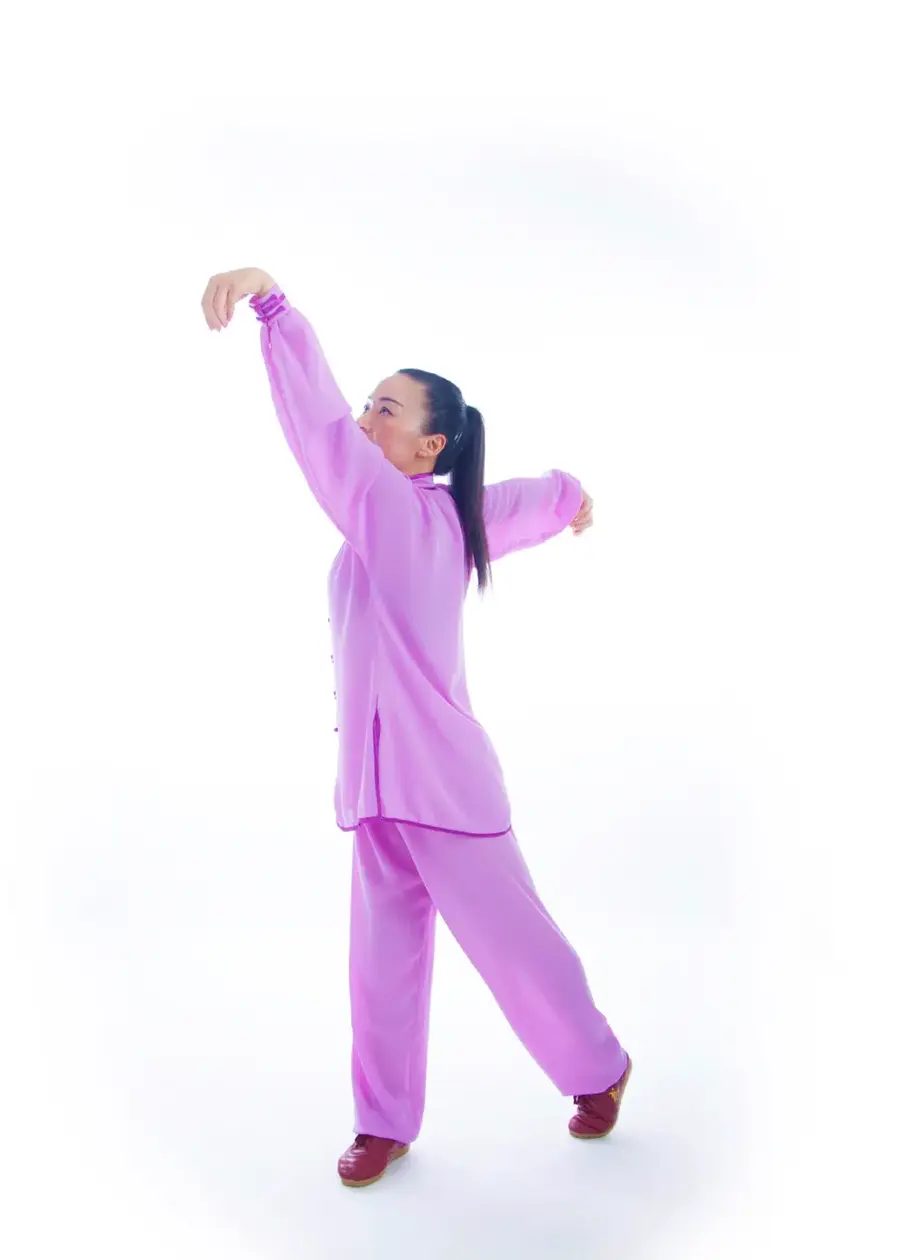
Breathing: natural breathing, or two breaths if you want to coordinate them.
Correction: three things are meant to happen at once — the foot withdraws while the body settles and the head turns; the reaching leg extends as the arm lengthens and the gaze lifts; the foot returns as the arm folds in and the gaze drops. The hook travels up in an arc from behind and reaches above the head, with a fast flick of the fingers, and the eyes follow the hook. A gentle hold is enough; there is no need to squeeze.
11. Bird Stretching (鸟伸)
The palms overlap in front of the lower belly with fingers together, rise to above and in front of the head with the wrists bent and palms level, then the wrists extend and the hands press down. The arms then open backwards into a wide V, palms turned upward into bird wings, as the other leg lifts behind and the torso forms a slight arch — the one backward-bending shape in the set. The shoulders draw in strongly around the upper back with the chin tucked, while the chest stays lifted and the lower back lengthens.
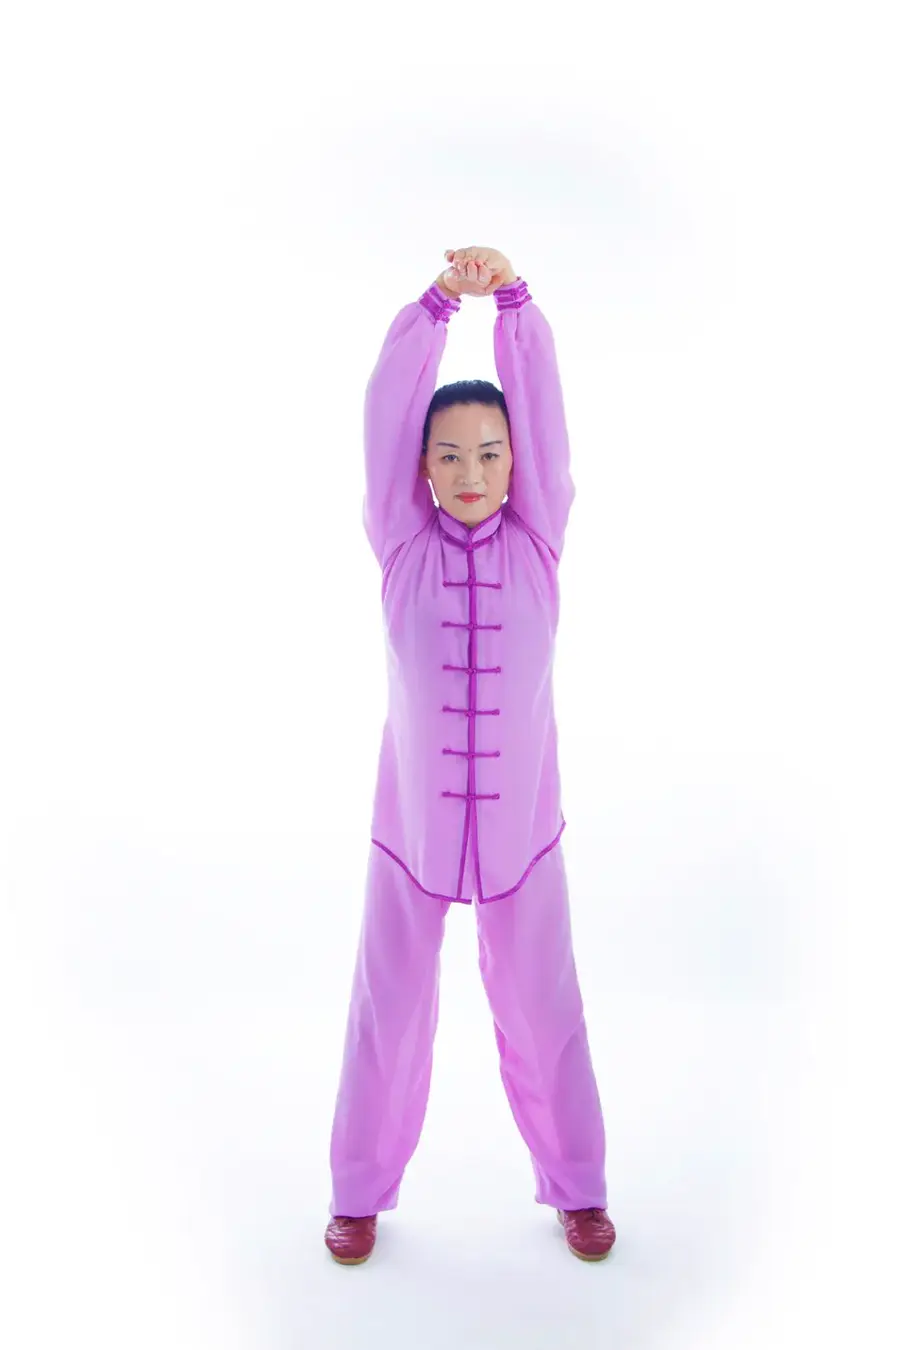
Breathing: one breath. Rise — inhale. Press down — exhale. Arms open back — inhale. Lower — exhale.
Correction: the palms stay level with the floor the whole way, and the arch comes from the chest lifting and the tailbone tucking, not from leaning forward. On the one-legged part, stay upright and keep the weight over the standing foot.
12. Bird Flying (鸟飞)
The hands face each other in front of the lower abdomen as if holding a ball, then the arms lift sideways — shoulders sinking first, then the elbows dropping and the wrists lifting — to ear height, palms turning into wings. They lower the same way in reverse: shoulders relax, elbows drop, palms press inward as if squeezing a balloon. Then the arms rise again above the head with the backs of the hands facing each other and a small gap at the wrists, and lower again. The legs lift and settle in alternation, the stance narrowing to half a shoulder width when the feet switch.
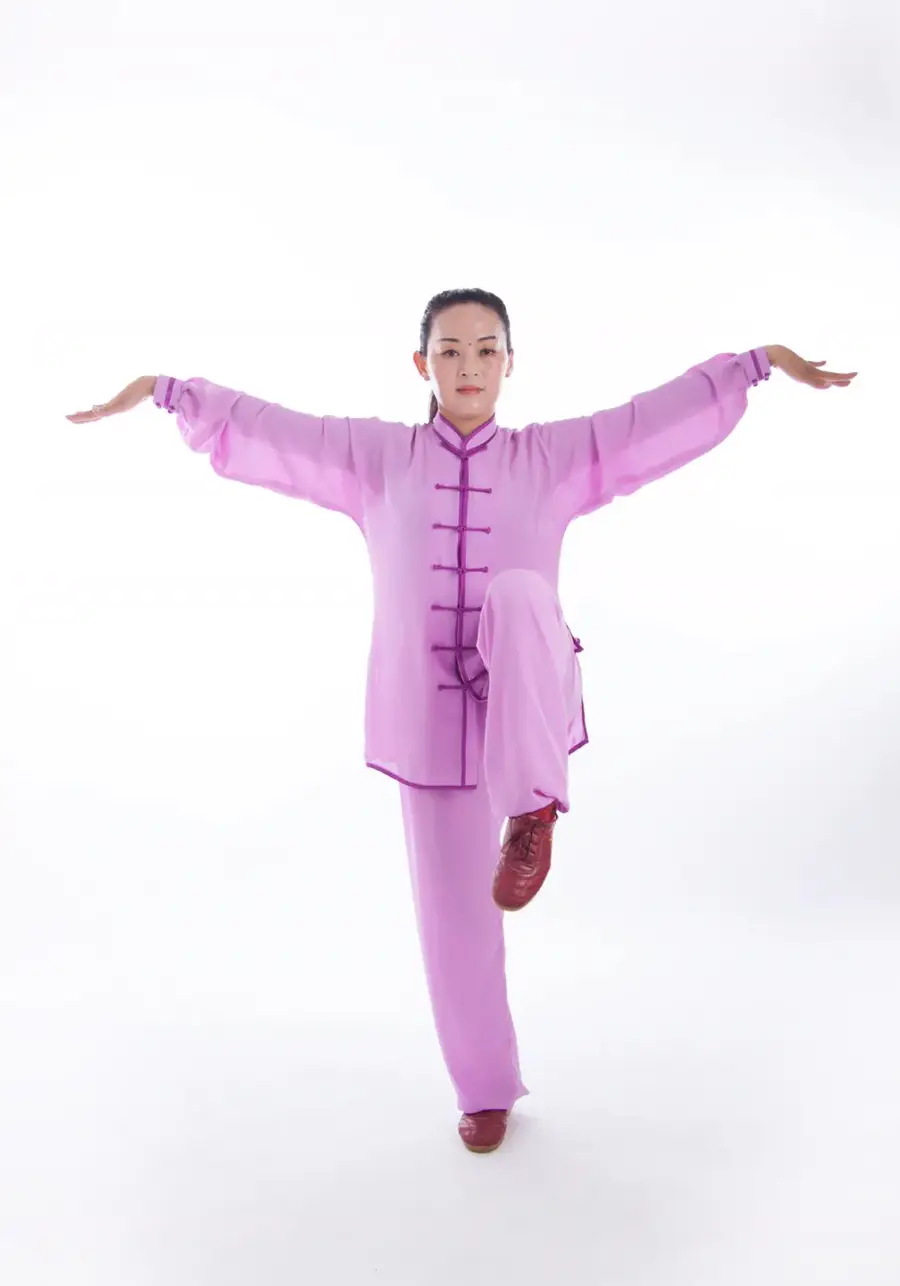
Breathing: two breaths per cycle. Open — inhale. Close — exhale.
Correction: the lift and the lower are a wave, not a rigid swing — shoulder, then elbow, then wrist. The hands change shape at shoulder height: side-on they are wings, low in front they are palms. On the one-legged part, bend the supporting knee and keep the lifted foot pointed rather than stiff.
13. Gathering the Qi (引气归元)
The hands lift in front with the arms rotating, then lower as the knees bend slightly and the hands close in front of the lower abdomen, palms facing each other at eye level. Then stand, lift and lower once more. To finish, both hands settle on the lower abdomen — left over right — and the practice closes with stillness.
Breathing: inhale as the hands rise, exhale as they settle.
The Four Breathing Rules
The set uses three deliberate breathing transitions — the opening, the side-raise transition, and the closing — and four rules that govern everything else:
- Rise and fall: inhale as the movement rises, exhale as it falls.
- Open and close: inhale as the limbs open, exhale as they close.
- Inhale first: in any movement where both inhaling and exhaling fit the action, the inhale comes first.
- Store and release: build up with the inhale, release with the exhale.
Above all: do not hold the breath. Deliberately forcing or holding the breath leaves you tight, and sustained strain on the breath is genuinely unpleasant. The aim is slow, even, long breathing — and the sequence is clear: learn the movement first, add the breathing once the body is relaxed and settled.
What Beginners Usually Notice
Most people notice three things in the first few weeks. The ankles and hips feel different after the deer and bear sections, because those are the parts that do the work. The breathing takes about a week to attach itself to the movement. And the set becomes easier to remember once the animal characters land — the tiger reaches, the deer twists, the bear rolls, the ape flicks, the bird floats.
Practice order matters more than practice length. Learn the opening and one animal until it is clean, add the next, and only then run the whole set.
Honest Limits
Wu Qin Xi is a moderate, low-impact movement practice. It is not a treatment for anything, and it does not replace medical care. Some cautions from the official guidance are worth repeating:
- Stop if you feel more than a light soreness. The benchmark is that you finish feeling alert and comfortable, with muscles mildly warm, and not tired enough to interfere with normal activity. Progress slowly; rushing defeats the point.
- If you have chronic conditions, are older, or are recovering from illness, keep the range smaller, the stance higher and the speed slower. Older shoulders in particular do not tolerate large, forceful movements.
- Depth is not the goal. A higher stance with clean mechanics is worth more than a deep stance with collapsed alignment.
- The deer twist needs judgement: too small an angle and the rotation never happens, too large and the knee takes the load.
In traditional theory the five animals are associated with different organ systems, and you will meet those associations in most books on the set. They are the meridian and five-phase theory of traditional Chinese medicine, serving the same broad aim as health preservation generally. They belong to a traditional framework and a cultural history, not to modern medical evidence, and this site does not present them as health claims — see clinical evidence for how that line is drawn here.
Where to Go Next
- The complete course — Wu Qin Xi — Five Animal Frolics sets out the four-week plan and takes the movements form by form.
- Every documented mistake, with the corrections — Wu Qin Xi Common Mistakes.
- Terminology — Wu Qin Xi (五禽戏) explains the animal names, the 12-movement structure and why the fifth form is called the bird form rather than the crane form.
- The set that uses sound instead of animals — Liu Zi Jue works by breath, mouth shape and self-massage, and belongs to the same official family of health qigong.
- The bigger picture — What qigong actually is and how the set compares with Ba Duan Jin and Daoyin.
This article is for education. It is not medical advice. Talk to a qualified healthcare professional before starting any exercise programme, especially if you are managing a health condition. Where traditional Chinese medicine is mentioned, it is described as history and framework — see clinical evidence for how this site reports research.
Master Mingde Chen
12th generation Chen-style inheritor with decades of teaching experience.
View all articles →